The Maya process is like this:
Select faces of the model (or you can select the whole model itself) - go to (Polygons) Create Uvs, there are a couple of types:
Planar (flat projection)
Cylindrical (for cylindrical objects)
Spherical (I rarely use it)
Automatic (a fast way to have your uvs done, but automatically organized, so not so good for precise texturing).
To check your Uvs go to (Polygons) - Edit UVs - UV Texture Editor.
To be able to work with your Uvs you have to select (right click - choose UV).
To be able to select different Uv parts - right mouse click -> UV, select uv vert in Uv Texture Editor, right mouse click choose To Shell.
EDGE - select an edge in Uv texture Editor - right mouse click choose EDGE. Select an edge, CTRL + right mouse click choose To Edge Loop.
Normalize Uv Options - when youhave selected shells and want to scale UVs to fit within the 0 to +1 texture range. In Texture Editor -> Polygons -> Normalize - choose the options - Collectively (good to have preserve aspect ration checked).
Flip Options - select a shell, in Texture Editor choose Polygons-> Flip options - Horizontal, Global, hit Apply once, Horizontal, Local hit Apply and close.
Now you have your shell mirrored on the other texture range 0 to -1.
The most used Tools in the top shell:
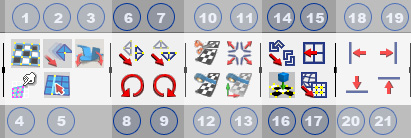 1. UV Lattice tool - a lattice for uvs
2. Move (w), Rotate (E) and Scale (R) tools, to mve, rotate and scale the selected uvs.
3. Unfold and Relax Tool - when you have selected uv verts click this tool and slide on option unfold to unforl, or Relax to relax uvs.
4. Uv Smudge tool - smudges or moves SELECTED uv verts
5. Select Shortest Edge path tool
6. Flip Uvs horizontally *
7. Flip Uvs vertically *
* (be careful using the flip tools - it can flip the uvs in the wrong direction, check with your texture pattern if the uvs are flipped the right way - dont use checker box pattern, use a pattern which has letters or numbers as well as checkers).
8. Rotates uv CCW (to the left)
9. Rotates Uv clockwise (to the rigth)
10. Cut Uvs (separate the uvs along the selected edges). The best way to cut uvs is when you have selected EDGES. In order to succesfully cut the uvs and make uv parts - the edges must not have a vertex or face connecting the parts you want to separate, so either use edge loops, or manually select the edges of irregular shapes.
11. Separate the selected UVs into one for each connected edge.
12. Sew the selected edges or uvs together (no movement of the uvs)
13. MOVE and sew the selected edges
14. Select faces to be moved in UV space
15. Snap selected Uvs to user specified grid
16. Unfold selected uvs
17. Automatically move Uvs for better texture space distribution
18. Align the selected verts on the left hand vertical side
19. Align the selected verts on the right hand vertical side
20. Align the selected verts on the horizontal (bottom) side
21. Align the selected verts on the horizontal (top) side
Additional Options:
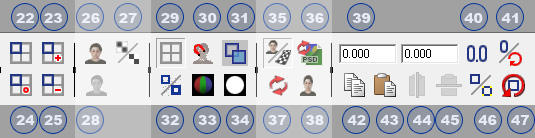 22. Toggle Isolate Select mode
23. Isolate Add selected shells
24. Remove ALL from Isolate Select Mode
25. Remove selected shells from Isolate Select Mode
26. Preview texture on/off
27. Toggle filtered Image on/off
28.DIm Image on/off
29. View UV Grid on/off
30. Pixel Snap on/off
31. Toggle Shaded Uv Display ( you can check for OVERLAPPING UVS with this button - where shading appears more opaque)
* ALSO this button is the perect button to show if you have ANY FLIPPED UVS!!! The wrongly flipped UVs are shown in RED color, the OK uvs are in BLUE color!
32. Display texture BORDERS on the active mesh
33. Display RGB Channels
34. Display Alpha Channel
35. UV Texture Editor Baking on/off
36. Update PSD Networks
37. Force Editor Texture Rebake
38. Use image ration on/off
39. Enter Value to set / transform in U and V
40. Refresh the current Uv Values
41. Toggle the mode of the UV entry fields between absolute UV position and relative transformation tool values
42. Copy Colors, Uvs and or shaders from a face to the clipboard
43. Paste Colors, Uvs and or shaders to faces from clipboard
46. Toggle Copy/Paste for faces/uvs
47. Cycles the UVs of the selected face counter clockwise
----------------------------------------------------------------------------------------------------------------
MOST IMPORTANT COMMANDS AND OPTIONS:
UNFOLD:
----------------------------------------------------------------------------------------------------------------
RELAX:
----------------------------------------------------------------------------------------------------------------
 UV LAYOUT (click image to enlarge):
Layout objects: - per object / - single
Prescale: -none / -object / -world
Separate Shells becomes available when Layout Objects Per Object is selected
-off / -folds / -all intersecting
ALWAYS check Flip reversed (if you have any reversed uvs it will flip it the right way!)
Layout Settings: (none, Along U, Into region)
Scale Mode: -none / -Uniform / -Strech to region
Shell Stacking: - Bounding Box / - Shape
Rotate: - none / - 90 degrees / - free
Shell Spacing:
Spacing presets: 32, 64, 128, 254, 512, 1024 Maps or Custom
Persantage space: default is 1.0000
Placement Settings:
Region Preset: all options to choose from...
when Numerical Settings is selected you can type numbers in the active fields.
*If in those settings UVLayout is acting weird and does not organize the shells according their size, thats means you have uv's flipped or doublesided uvs. Unfold all the shells then and everithing should seem blue (check button N 31 in the graph above). Then apply UVLaouyt command.
*********************************
UV LAYOUT for precise moving UVs from one Square Map to Another even with flipped Uvs

Layout Uv Shells - Even with UVs that are flipped the settings above will allow you to move the selected Uv shells to the same space but on different square.
Layout Objects - Single or multiple objects (non_overlapping)
Prescale - None
Flip reversed is OFF
Shell layout- None
Scale Mode - Uniform
Shell stacking - Shape
Rotate - None
Placement settings - Region preset - Numerical Entry
Scale U and Scale V stay at 1 always
Offset U and Offset V are the numbers you need to change in order to relocate the Uvs to a different quadrant. Values -2, -1, 1, 0, -1, -2, etc
----------------------------------------------------------------------------------------------------------------
UV SNAPSHOT:
Have your model selected. All Uvs must be inside the Top Right hand square. Right click choose UV, select all uvs, go to Polygons->> Uv Snapshot (on the bottom). By default Maya saves them in folder "images" as outUv (you may change that folder by clicking Browse).
Choose a size for the texture (keep aspect ratio)
Use Targa, Jpg, Bmp or any other file format).
UV Range Options - Normal (0 to 1) - here you point to Maya which UV square to be snapshoting (default is 0 to 1).
----------------------------------------------------------------------------------------------------------------
Move Vertex along with Uv verts.
In move (and scale tool) Tool Settings CHECK ON "Preserve Uvs". Now when you move your vertex the uv will follow. And the opposite, when you dont want the uv to follow movement or scale on vertexes, uncheck "preserve Uvs".
--------------------------------------------------------------------------------------------------------------
Some tips:
If you have place2dtexture missing - when assigning files to shaders in maya - when you click on color swatch will bring up Create render node option (on the top make sure you have "Witch New Texture Placement" - CHECKED, otherwise it will not create the place2dtexture node!
You can also create it separately and connect it to the file.
----------------------------------------------------------------------------------------------------------------
great Lilly!
ReplyDelete